 |
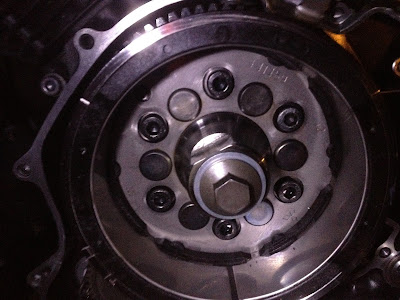
| Stator case opened. |
Removing one case is not as simple as it seems. The oil has to be drained, the kickstand has to be removed as well as parts of the shift linkage and rear brake. I propped up some 2X4's on the other side to hold the bike up. Too poor or too lazy to get a proper stand.
 |
| When removing the rear brake linkage, make note of where the dot marker is relative to the gap, it has to go back in the exact spot. |
Removing all other obstructions, no matter how small, helps out a lot in saving time when complications arise.
The case is held on by a magnet (little shaft on the bottom right) so care has to be taken during removal. I used a rubber mallet to pry it off gently.
 |
| Using the gasket trace to keep the bolts in order |
The bolts that hold the stator case open are of several different lengths, so to keep everything in order, I traced the new gasket on the cardboard it came in, including the bolt holes where I made a cross cut in each. As I removed each bolt I just stuck it onto the cardboard.
 |
| Milky residue in crankase from water mixing with oil |
The importance of not letting a leak like this go by for long is the potential damage it can do. The problem is that water can get in your system and cause problems. When oil gets contaminated, it doesn't get to do its job properly which is lubricate engine components, cool them off, reduce friction, etc.
 |
| More residue to clean off. Note the black rubber looking material the residue is sitting on, that's the old, tough-as-nails gasket which is a troublesome part to remove. |
I cleaned out my crankcase with some rags, Qtips, and a second oil change after.
 |
| Rust |
Moisture seeped into the stator case and caused the shaft to rust. I cleaned that off with a wire brush or detailing brush as some would call it.
 |
| Rust cleaned off |
The hardest and most tedious part was removing the old gasket. That thing melted onto the case and was a tough SOB to scrape off.
I could've used some more aggressive methods but I didn't want to damage the case and I needed a nice even finish to get a good seal. It took hours off applying gasket remover, waiting, then scraping with a putty knife and wire brush to get all the material off.
 |
| Mating surface area (edges) cleaned |
 |
| Surface area cleaned and ready for new gasket |
 |
| Gasket sealant applied minimally |
I used a very thin layer of gasket sealant on both sides, nothing fancy, just used my fingers to smooth it over the mating surfaces. I placed the new gasket on the stator side and then mounted the stator back onto the crankcase. The gasket isn't a super perfect fit, at the bottom just a slight bit of gasket sticks out once the surfaces are mated.
The repair did the job. No more leak, but I still don't know why the seal failed in the first place, which is why I opted for the gasket sealant. The only thing I did differently was use Rotella T6 Synthetic 5W40 oil which I started a couple of months before this problem happened.
If you have had the same problem, know why the gasket failed, or if you have tips on how I can save some trouble next time, let me know! Hope this helps somebody out.
I recently added the GAK mod so I'll be posting about that soon.
It is very important for you to check your bike for any oil leakage because the leakage of the brake oil can cause serious accident .
ReplyDeleteThanks
Henry Jordan
Hydraulic Seal Kits
Well done, nice write up. There is nothing like the feeling of fixing it yourself. Not to mention, you save money for other modifications later:) Ride safe!
ReplyDeleteI gotta say:
ReplyDeleteKudos for your bravery & skills re: motorcycle maintenance! But also for your excellent writing. Thanks for the knowledge!
This comment has been removed by a blog administrator.
ReplyDeleteI recently purchased a V-Star 650 custom 2005 and it has the same problem after only 2 weeks of riding. Could you provide me with the part number for the gasket?
ReplyDeleteMuch appreciated and thank you for the write up.
help I'm trying to locate stator I think I got it but want to be sure
ReplyDeleteleft side of the bike
ReplyDeleteHey i got my crank case off, how do I disconnect the wire from the ststor from the bike to get the case completely off to stsrt cleaning everything off for the gasket?
ReplyDeleteHey i got my crank case off, how do I disconnect the wire from the ststor from the bike to get the case completely off to stsrt cleaning everything off for the gasket?
ReplyDeleteAwesome write up. Thank you.
ReplyDeleteAwesome write up. Thank you.
ReplyDeleteI'm in the same process now. Didn't think to mark where the bolts go as you did so now I'm stuck trying to figure it out and can't find much on the internet. Wish I would have thought of that. Would have made everything much easier.
ReplyDeletehe marked them by outling the new gasket in cardboard and placed the bolts in the cardboard as he took them off!
DeleteGreat write up! I will be using the gasket bolt location idea once I figure out where oil is coming from.
ReplyDeleteI need help please I didn't mark the bolt holes so now I don't know what bolt goes where and I didn't know to look where the couch shifter circle was
ReplyDelete