Thursday, June 2, 2011
Contacting Me
If you need to contact me and ask about the mods I've done or need some more clarification, you can e-mail me at rina1504@gmail.com or go to the www.vtwinmama.com forum and post in the message boards. It's an awesome site with other friendly riders offering advice on riding, maintenance, modifications, and just plain talking. Safe riding ;-)
Monday, January 17, 2011
Until February
I won't be able to do any mods on my bike for a few weeks due to moving so I'm just riding for the meantime.
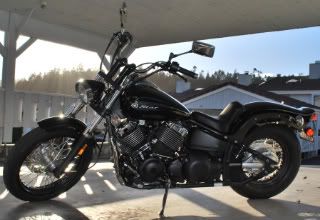
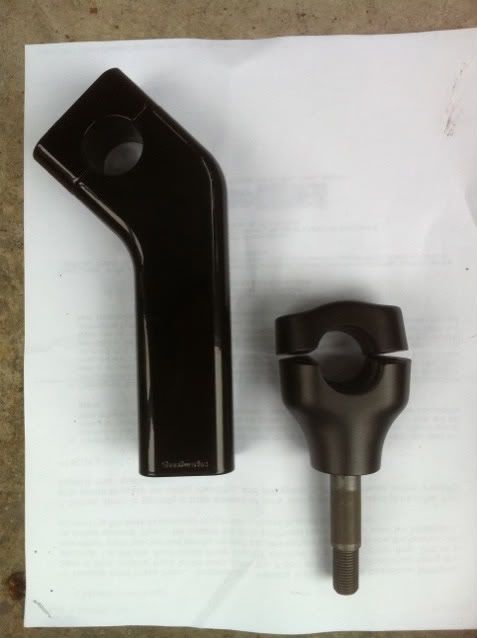
Scootworks Phat Risers II
Barely flat footing the 650 can also mean barely reaching the handlebar. I notice I run out of arm room whenever I try to do some sharp or low speed turns. This is where the risers come into play. There were so many to choose from, I had a headache surfing through the web finding ones I liked. However, they all came in chrome. Barely any came in black that had the pullback I wanted, so I went with Scootworks Phat Risers II for a 2" increase in height and a 3" increase in pullback over the stock ones. The II's require the cables to be re-routed, the I's don't. I'm not sure if the III's will even fir the 650 but those would require new cables if they do.
Stock Risers
The instructions were straight forward, nothing confusing about them. I didn't follow the recommended tips though because I didn't have a bike jack to lift the front end. You have to do this to take pressure off the front end when removing the top triple tree. This would be the fasted way to re-route the cables. I was curious if I could do it a different way, without disconnecting any cables except the throttle. Well I did, and it was time consuming as hell and had me removing the throttle, brake, and headlight assemblies.
This post will be less detailed on each of the steps I took because it's just too long. I needed to use all my hands and I just wanted it done before the rain got heavy so less pics on this. Also, this one is not to be taken alone by anyone with only a very basic understanding of mechanics. It's possible, but I hope at this point you have an understanding of the proper ways to remove/start bolts, preventing stripped bolts, using a torque wrench, the proper way to evenly tighten bolts on an assembly, etc.
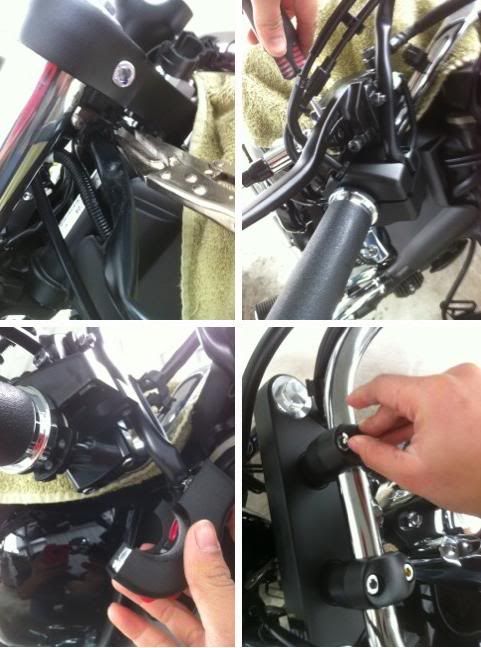
In whatever way you're going to approach changing out your stock risers with a required cable re-route, cutting off all the plastic ties holding the cables before anything else makes life so much easier.
Before taking off the risers, I covered the gas tank with a towel, took the headlamp mounting bolts off and covered the headlamp with an old shirt. I also removed the mirrors to make the handlebar lighter. With a screwdriver, I removed the two screws holding the throttle assembly together and removed the grip from the handlebar. Using a 5 mm allen key, I removed the brake assembly but left the brake lever attached. With 10" bolt cutters, I snipped of parts of the wiring bracket mounted underneath the top triple tree holding the brake, clutch, and throttle cables in place. I didn't need them with the new risers as the cables will lose their slack. I put the two assemblies through the triple trees. I had to push the headlamp away a bit for both pass through.
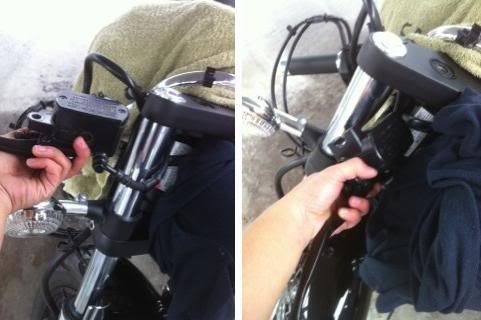
You can disconnect the throttle from either end, at the lever or at the crankcase. I did it at the crankcase, I didn't want to mess with the handle since I had already adjusted it a few times when I installed the Clevver. Disconnecting it from the crankcase, I just took the adjusting nuts off and slid the throttle cable out of the metal holder.
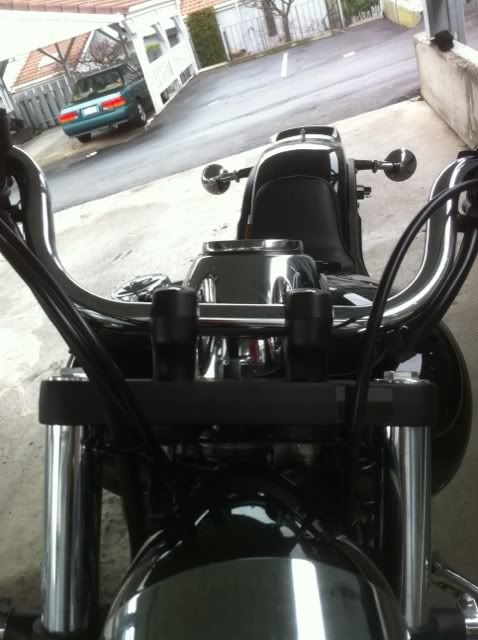
Comparison
After all that, then I removed the stock risers and let the handlebar rest on the gas tank. I installed it according to directions on the package and then put the handlebar on. I tightened it just enough to hold it in place and I connected everything back to the handlebar. I routed the throttle cable behind the triple trees and connected it back to the crankcase. Sounds simple, but since I was working alone, I had to keep re-positioning things so they wouldn't fall or scratch anything which was very time-consuming.
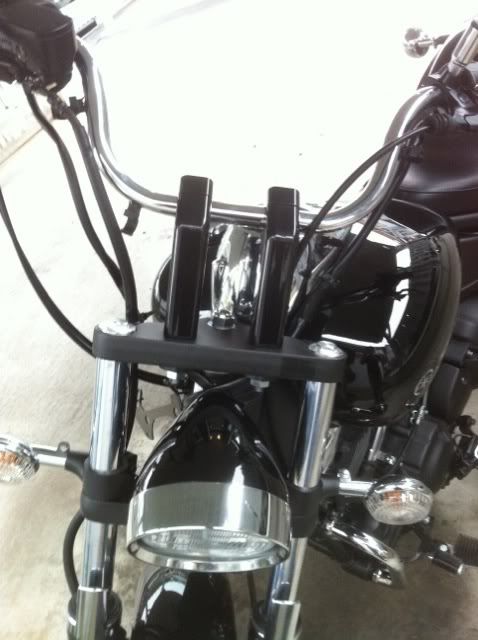
The 3" pullback helps out a lot. I can now bend my elbows and with the handlebar sitting higher, it takes a lot of stress of my shoulders. This is important for me because an old work accident a couple of years ago now makes my left shoulder muscles cramp at particular positions. It's not painful, just feels odd and nagging. I guess if you're cutting the 5'0 height like I am, the II's are the way to go. Someone taller than that can probably manage with the I's and no cable re-routing.
Before and After pics to show the difference:
Stock:
Scootworks Phat Risers II

Stock Risers
The instructions were straight forward, nothing confusing about them. I didn't follow the recommended tips though because I didn't have a bike jack to lift the front end. You have to do this to take pressure off the front end when removing the top triple tree. This would be the fasted way to re-route the cables. I was curious if I could do it a different way, without disconnecting any cables except the throttle. Well I did, and it was time consuming as hell and had me removing the throttle, brake, and headlight assemblies.
This post will be less detailed on each of the steps I took because it's just too long. I needed to use all my hands and I just wanted it done before the rain got heavy so less pics on this. Also, this one is not to be taken alone by anyone with only a very basic understanding of mechanics. It's possible, but I hope at this point you have an understanding of the proper ways to remove/start bolts, preventing stripped bolts, using a torque wrench, the proper way to evenly tighten bolts on an assembly, etc.
In whatever way you're going to approach changing out your stock risers with a required cable re-route, cutting off all the plastic ties holding the cables before anything else makes life so much easier.
Before taking off the risers, I covered the gas tank with a towel, took the headlamp mounting bolts off and covered the headlamp with an old shirt. I also removed the mirrors to make the handlebar lighter. With a screwdriver, I removed the two screws holding the throttle assembly together and removed the grip from the handlebar. Using a 5 mm allen key, I removed the brake assembly but left the brake lever attached. With 10" bolt cutters, I snipped of parts of the wiring bracket mounted underneath the top triple tree holding the brake, clutch, and throttle cables in place. I didn't need them with the new risers as the cables will lose their slack. I put the two assemblies through the triple trees. I had to push the headlamp away a bit for both pass through.
You can disconnect the throttle from either end, at the lever or at the crankcase. I did it at the crankcase, I didn't want to mess with the handle since I had already adjusted it a few times when I installed the Clevver. Disconnecting it from the crankcase, I just took the adjusting nuts off and slid the throttle cable out of the metal holder.
Comparison
After all that, then I removed the stock risers and let the handlebar rest on the gas tank. I installed it according to directions on the package and then put the handlebar on. I tightened it just enough to hold it in place and I connected everything back to the handlebar. I routed the throttle cable behind the triple trees and connected it back to the crankcase. Sounds simple, but since I was working alone, I had to keep re-positioning things so they wouldn't fall or scratch anything which was very time-consuming.
The 3" pullback helps out a lot. I can now bend my elbows and with the handlebar sitting higher, it takes a lot of stress of my shoulders. This is important for me because an old work accident a couple of years ago now makes my left shoulder muscles cramp at particular positions. It's not painful, just feels odd and nagging. I guess if you're cutting the 5'0 height like I am, the II's are the way to go. Someone taller than that can probably manage with the I's and no cable re-routing.
Before and After pics to show the difference:
Stock:
Scootworks Phat Risers II
Sunday, January 9, 2011
Battery Tender Jr.
The most practical mod or addition I've done is hooking up a Battery Tender Jr. to my 650. This should have been the first thing I thought of but I had no idea how quick a motorcycle battery loses potential in just a few days. For around $30 at the auto store, it's paid for itself over and over in just a few short weeks.
It took about 10 minutes to install using a Phillips screwdriver and a 5mm allen key. Don't be too gentle when taking off the cover, that right side needs a solid tug to take off.
Make sure to remove any rings, bracelets, and other accessories from your hands before working near the battery. Familiarize yourself and follow all electrical safety precautions.
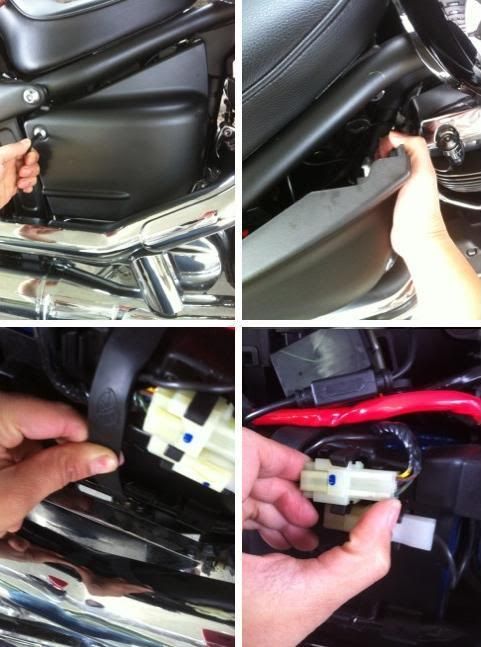
Loosen the strap by pulling it downwards then towards you, that should clear the D-Ring at the end from the plastic tab it's hooked to. Take off the two visible wiring connectors by pulling it off carefully from the plastic tabs. Bend the plastic battery cover away from the battery.
Here's how I was taught in Navy "A" school about disconnecting batteries: "Red socks, black boots, which one can you take off first?". Disconnect the black negative cable using a Phillips screwdriver with an insulated handle. Even though the cable is not a threat once it's off, as good practice treat it like a live cable and make sure it doesn't contact any metal pieces. Disconnect the red positive cable from the battery. Treat it like a live cable as well. Take the Battery Tender wire with the red end and insert it over the red cable, then re-connect to the positive terminal. Do the same with the black end over the negative cable. Start threading the screws by hand if you can, that way you are less likely to contact the frame with the screwdriver and make a complete circuit (fry your battery). The upside is there aren't very many metal pieces around the battery compartment to do this with, the 650 Custom is a plastic master piece in this regard.
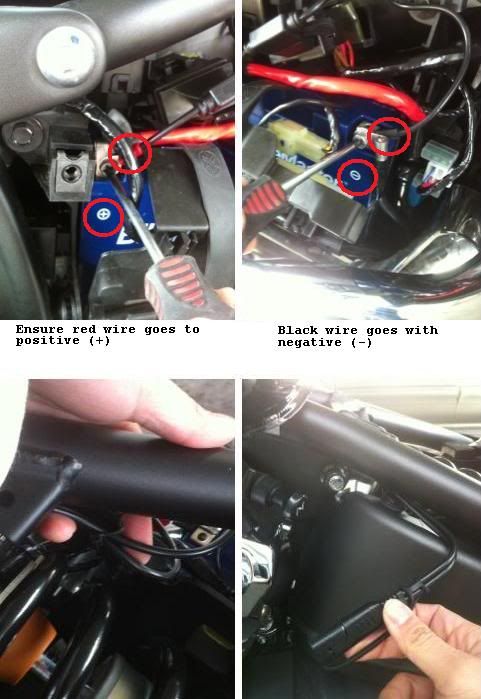
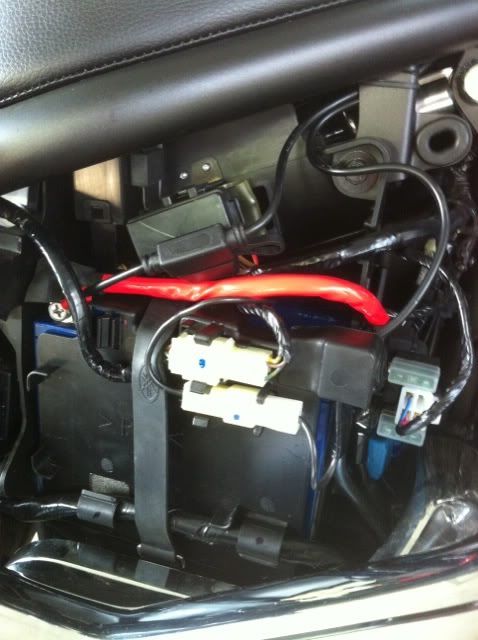
After taking off the seat, I used two black zip ties to secure the wires under the seat and around the shock. This placed the cables out of the way and I was able tuck them discreetly over the storage compartment or inside it.
Before putting the battery cover back on, you might want to start your bike to make sure you didn't disconnect anything or if you did, that you remembered to re-connect them.
Test out the Battery Tender Jr. by following instructions in the package (plug it in, make sure the light is red = charging). Put the covers back together once you're satisfied everything works properly.
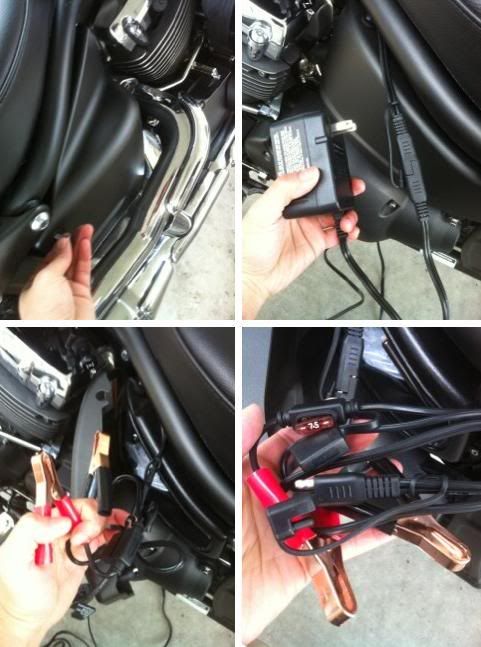
An added benefit is that it comes with jumper cables. You don't need to take off your battery cover when you need to jump start your bike. Just simply hook up the cables the same way as the charger, make sure you keep the black and red clamps away from each other, if they touch you're in for a nice surprise. It also comes with a 7.5 amp fuse to protect your battery in case it's getting too much amps like if jump starting from a running car. It's also small enough to carry inside the compartment. For jump starting, "red socks, black boots" still applies.
UPDATE: Someone kindly pointed out that the cables are switched at this point. If you use the cables, red will actually be ground. Also, the jumper cables should probably only be used when using a battery with a similar rating (jump starting from another motorcycle). If using a car battery, use regular jumper cables for the car.
Now, just plug it in and charge.
It took about 10 minutes to install using a Phillips screwdriver and a 5mm allen key. Don't be too gentle when taking off the cover, that right side needs a solid tug to take off.
Make sure to remove any rings, bracelets, and other accessories from your hands before working near the battery. Familiarize yourself and follow all electrical safety precautions.
Loosen the strap by pulling it downwards then towards you, that should clear the D-Ring at the end from the plastic tab it's hooked to. Take off the two visible wiring connectors by pulling it off carefully from the plastic tabs. Bend the plastic battery cover away from the battery.
Here's how I was taught in Navy "A" school about disconnecting batteries: "Red socks, black boots, which one can you take off first?". Disconnect the black negative cable using a Phillips screwdriver with an insulated handle. Even though the cable is not a threat once it's off, as good practice treat it like a live cable and make sure it doesn't contact any metal pieces. Disconnect the red positive cable from the battery. Treat it like a live cable as well. Take the Battery Tender wire with the red end and insert it over the red cable, then re-connect to the positive terminal. Do the same with the black end over the negative cable. Start threading the screws by hand if you can, that way you are less likely to contact the frame with the screwdriver and make a complete circuit (fry your battery). The upside is there aren't very many metal pieces around the battery compartment to do this with, the 650 Custom is a plastic master piece in this regard.
After taking off the seat, I used two black zip ties to secure the wires under the seat and around the shock. This placed the cables out of the way and I was able tuck them discreetly over the storage compartment or inside it.
Before putting the battery cover back on, you might want to start your bike to make sure you didn't disconnect anything or if you did, that you remembered to re-connect them.
Test out the Battery Tender Jr. by following instructions in the package (plug it in, make sure the light is red = charging). Put the covers back together once you're satisfied everything works properly.
An added benefit is that it comes with jumper cables. You don't need to take off your battery cover when you need to jump start your bike. Just simply hook up the cables the same way as the charger, make sure you keep the black and red clamps away from each other, if they touch you're in for a nice surprise. It also comes with a 7.5 amp fuse to protect your battery in case it's getting too much amps like if jump starting from a running car. It's also small enough to carry inside the compartment. For jump starting, "red socks, black boots" still applies.
UPDATE: Someone kindly pointed out that the cables are switched at this point. If you use the cables, red will actually be ground. Also, the jumper cables should probably only be used when using a battery with a similar rating (jump starting from another motorcycle). If using a car battery, use regular jumper cables for the car.
Now, just plug it in and charge.
Wednesday, January 5, 2011
West Eagle Solo Seat for V Star Custom 650
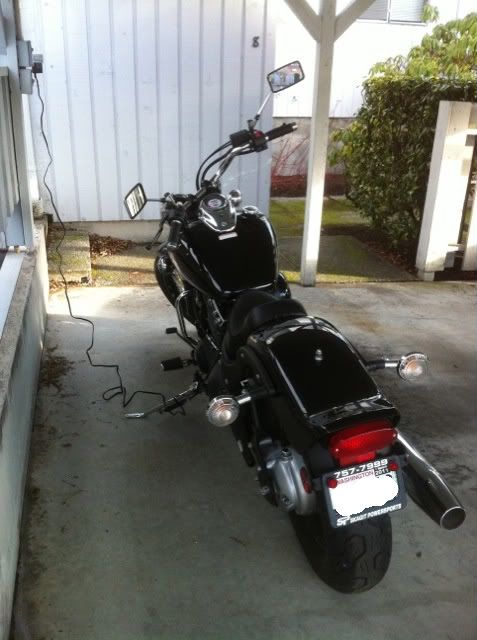
Since I already took the pillion seat out the day I got the bike, I only needed a 5 mm allen key to take the stock seat out. If you still have the pillion, you can remove it by taking off the nut at the very back of the seat. That's the only thing holding it in place.
650 owners have often voiced their disdain about how the stock seat makes them feel like they're riding on top of the bike instead of the much coveted "in the saddle feel". This seat definitely delivers on that whim. It is so much thinner than the stock, but quite more comfortable.
It truly takes out a lot of the excess padding where I wasn't too crazy about, the sides. With a shortened width and a thinner base, this is what comes into play for reducing the seat height. It didn't really lower it as much as I wanted, but I haven't been able to test ride it yet due to ice conditions. I'll update once I take it for a spin and write about the comfort factor.
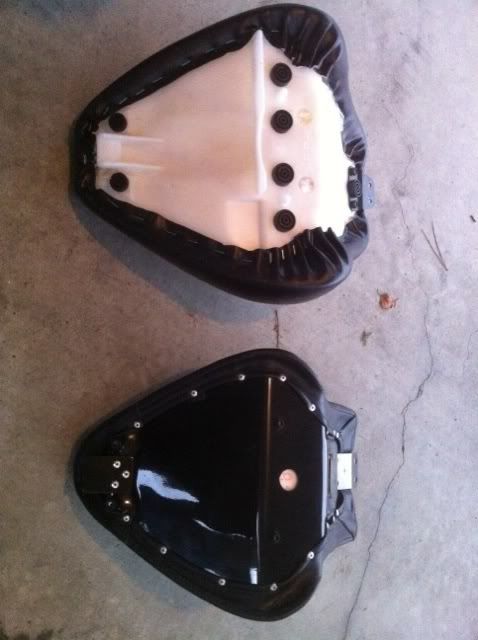
For being priced so closely, a stock seat replacement is $149.87 with the West Eagle one at $159, this seat is miles ahead on quality. It's riveted at the bottom instead of stapled and has a steel base instead of fiberglass or plastic.
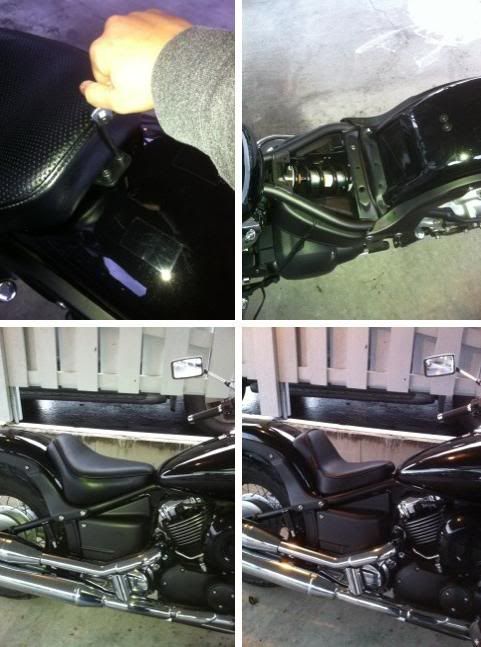
Sitting on it, the high end back provides a nice lumbar support, very comfortable on the lower back. This might come in handy on long trips when I want to lean back a little.
You can truly appreciate the slimming effect it has on the sides with this view. I'd say it probably took off about close to an inch for seat height.
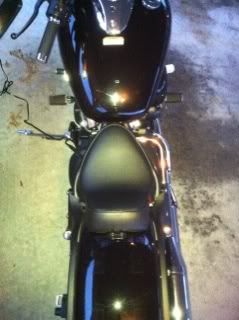
The only downside I can see with this seat it is doesn't do a thing for my handlebar reach. It actually might have decreased it, but I was already coming up short even on the stock seat. That should take me to my next mod which will be to add some risers.
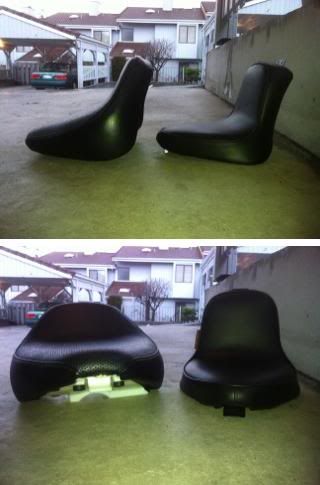
Stock Seat
West Eagle Solo Seat
650 owners have often voiced their disdain about how the stock seat makes them feel like they're riding on top of the bike instead of the much coveted "in the saddle feel". This seat definitely delivers on that whim. It is so much thinner than the stock, but quite more comfortable.
It truly takes out a lot of the excess padding where I wasn't too crazy about, the sides. With a shortened width and a thinner base, this is what comes into play for reducing the seat height. It didn't really lower it as much as I wanted, but I haven't been able to test ride it yet due to ice conditions. I'll update once I take it for a spin and write about the comfort factor.
For being priced so closely, a stock seat replacement is $149.87 with the West Eagle one at $159, this seat is miles ahead on quality. It's riveted at the bottom instead of stapled and has a steel base instead of fiberglass or plastic.
Sitting on it, the high end back provides a nice lumbar support, very comfortable on the lower back. This might come in handy on long trips when I want to lean back a little.
You can truly appreciate the slimming effect it has on the sides with this view. I'd say it probably took off about close to an inch for seat height.
The only downside I can see with this seat it is doesn't do a thing for my handlebar reach. It actually might have decreased it, but I was already coming up short even on the stock seat. That should take me to my next mod which will be to add some risers.
Stock Seat
West Eagle Solo Seat
Monday, January 3, 2011
Another for the Clutch - Clevver Mod
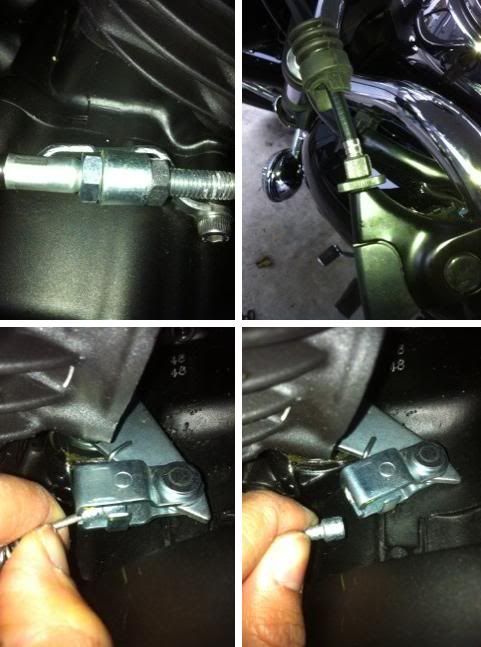
The Seritec clutch mod works great but halfway through the test ride my left hand kept cramping. It wasn't always a problem but because of playing classical guitar, the cramps have gotten worse over the years. Having tiny hands also makes it harder to manipulate the clutch at low speeds. I heard about the Clevver and how it reduces the pulling effort for the clutch. Gave it a try and it's definitely worthwhile. Here's the view from underneath the clutch handle.
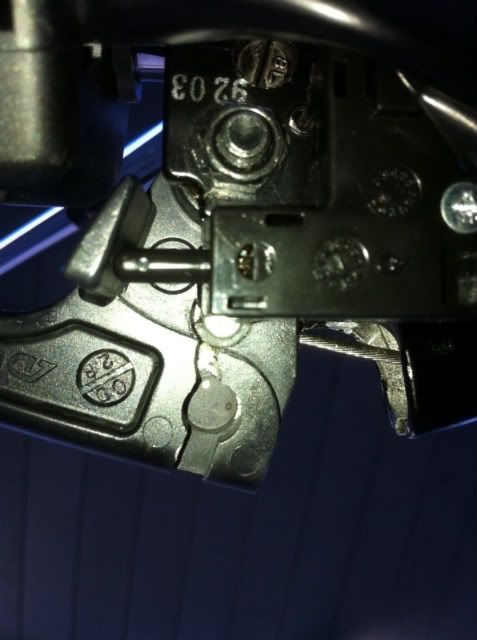
It's just the stock clutch handle with a new hole drilled and the cable slot enlarged. Again, if you want to save money, you can attempt to do this mod with your stock clutch and a reliable drill with good bits. $40 is all right for having the precise measurements and drilling done. Would be safer to do with a bench drill since it does require the hole to be straight.
I had to file the housing down to accept the new lever because if you look at the pic, the new position of the cable end has to pass over the edge of the housing. It's 1/16" too thick to clear the edge hence the slight filing. Models before '09 might not encounter this problem, mine's the only one I've seen with this minor change.
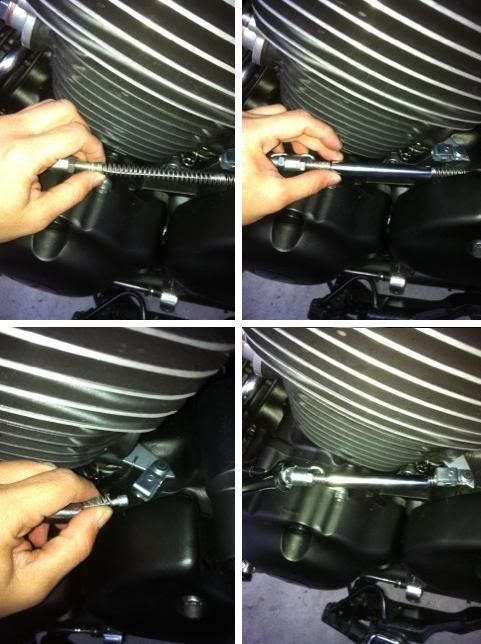
I had to back out the clutch lever adjusting nut almost all the way out just to ensure the clutch is fully disengaged when I pull on the lever. You can tell if you're clutch is not fully disengaging by testing it out:
With the engine running and the bike in neutral, put up the side stand and duck walk the bike carefully. If it's smooth, then carefully shift it to first. You shouldn't feel a sudden lurch. Still in first with the clutch lever pulled in, you should be able to smoothly walk it out like in neutral.
If in neutral there's a drag to the bike when you push it, adjust it before you test it out in first, the clutch is not fully disengaging.
I didn't just do this test in my driveway. After adjusting it properly, I rode it in a safe area for a little bit, did some upshifts and downshifts. After it warmed up, the cable felt a bit looser and I had to do some more adjustments.
This is probably why Yamaha limited the range of clutch adjustments to just the lever free play. An improperly adjusted clutch cable will burn out your clutch faster and it's definitely not safe especially when shifting out of neutral.
Combined with the Seritec mod, it's now possible to adjust the friction zone beyond the clutch lever pulled all the way in. That's why it's important to test it out and tweak it. I had to adjust both ends, the lever adjusting nut as well as the crankcase adjustment by the seritec addition. As well as the clutch fully disengaging when you pull it in, it should also fully engage when the lever is all the way out.
On a note, with both mods installed, my clutch lever doesn't go back out to what used to be the fully engaged position past the free play. At regular operation, it just stops where the free play is supposed to start, but it's already fully engaged. This is because of the new angle the cable takes with the clevver. The free play zone is now more of a "dead" zone. If anyone else has notice this, tell me about because I'm curious as how it acts in different models.
Overall, it did reduce the pull effort significantly and gave me a wider range for the friction zone. Tested it out with u-turn and figure 8's and had vastly improved control with no hand cramping. It becomes more forgiving, plus I only need to release the clutch lever by an inch to get into that sweet spot for tight u turns with a slight throttle and brake control. Hill starts were much easier. If you had problems stopping and taking off on an incline or even just at stop signs, this will ease the pain. Especially for guitar players.
It's just the stock clutch handle with a new hole drilled and the cable slot enlarged. Again, if you want to save money, you can attempt to do this mod with your stock clutch and a reliable drill with good bits. $40 is all right for having the precise measurements and drilling done. Would be safer to do with a bench drill since it does require the hole to be straight.
I had to file the housing down to accept the new lever because if you look at the pic, the new position of the cable end has to pass over the edge of the housing. It's 1/16" too thick to clear the edge hence the slight filing. Models before '09 might not encounter this problem, mine's the only one I've seen with this minor change.
I had to back out the clutch lever adjusting nut almost all the way out just to ensure the clutch is fully disengaged when I pull on the lever. You can tell if you're clutch is not fully disengaging by testing it out:
With the engine running and the bike in neutral, put up the side stand and duck walk the bike carefully. If it's smooth, then carefully shift it to first. You shouldn't feel a sudden lurch. Still in first with the clutch lever pulled in, you should be able to smoothly walk it out like in neutral.
If in neutral there's a drag to the bike when you push it, adjust it before you test it out in first, the clutch is not fully disengaging.
I didn't just do this test in my driveway. After adjusting it properly, I rode it in a safe area for a little bit, did some upshifts and downshifts. After it warmed up, the cable felt a bit looser and I had to do some more adjustments.
This is probably why Yamaha limited the range of clutch adjustments to just the lever free play. An improperly adjusted clutch cable will burn out your clutch faster and it's definitely not safe especially when shifting out of neutral.
Combined with the Seritec mod, it's now possible to adjust the friction zone beyond the clutch lever pulled all the way in. That's why it's important to test it out and tweak it. I had to adjust both ends, the lever adjusting nut as well as the crankcase adjustment by the seritec addition. As well as the clutch fully disengaging when you pull it in, it should also fully engage when the lever is all the way out.
On a note, with both mods installed, my clutch lever doesn't go back out to what used to be the fully engaged position past the free play. At regular operation, it just stops where the free play is supposed to start, but it's already fully engaged. This is because of the new angle the cable takes with the clevver. The free play zone is now more of a "dead" zone. If anyone else has notice this, tell me about because I'm curious as how it acts in different models.
Overall, it did reduce the pull effort significantly and gave me a wider range for the friction zone. Tested it out with u-turn and figure 8's and had vastly improved control with no hand cramping. It becomes more forgiving, plus I only need to release the clutch lever by an inch to get into that sweet spot for tight u turns with a slight throttle and brake control. Hill starts were much easier. If you had problems stopping and taking off on an incline or even just at stop signs, this will ease the pain. Especially for guitar players.
Sunday, January 2, 2011
Seritec Clutch Mod
Here's what I was talking about with the clutch. This was the first modification I did to increase the bike's elusive friction zone.
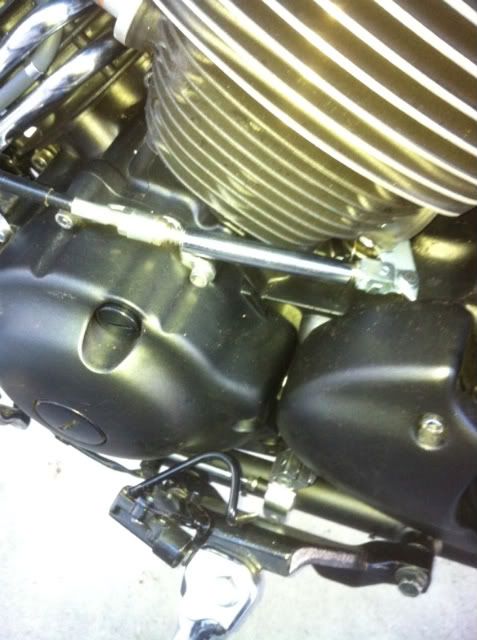
I know it's just a metal tube with a spring inside it, something that you can do yourself for a under $5. The make-it-yourself and DIY mod can be found in 650 Custom, Chopper, and Dragstar site in their How-To section.
I went with the pre-made kit from Seritec. Since I'm a bit lazy to test out different tube sizes and to find the right spring length, $14 isn't a bad price to pay someone for the parts and the labor in testing to find the right specs. E-mail Roger at seritc@aol.com for questions about it. He sells them on eBay, but if you e-mail him he sells them at a lower rate. No problems with shipping either.
The illustrated instructions are very clear and easy to use, I only needed a 12mm combo wrench. Depending on the year model, you might need some long nose pliers to take the cable end out of its housing by bending the little metal tab blocking it in. Increasing the free play from the lever end (backing the nut and adjusting bolt in toward the lever) gave me all the slack I needed to do this. All the work was done at the crankcase end.
I had absolutely no problems with this mod and it did what it was advertised to do. Rode for about 20 miles to test it out and it's solid. The friction zone now started at roughly about 1 1/2" away from the handlebar grip.
Although I'm thinking this probably voids the warranty somehow. Just take it off when you take it to the dealer if in question.
Basic Tools to Get Started
If you open up the black case underneath the seat on the kickstand side you'll find a handy compartment with a set of tools. Or hopefully they're there. If you have a used bike, chances are the original owners lost them. Here's what should be inside that tool kit
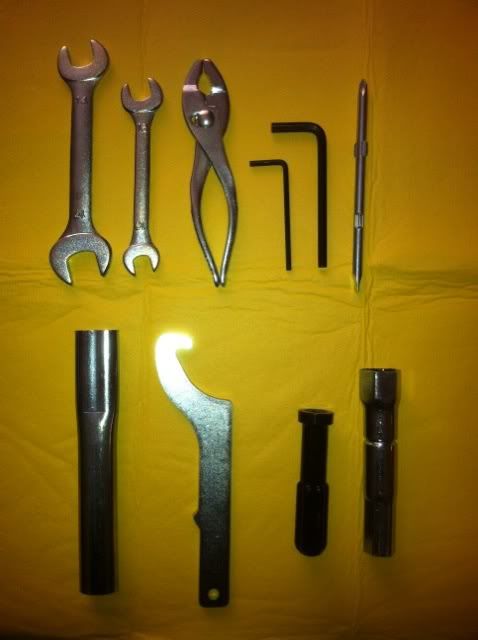
We'll get to more of those tools later down the road when I get a chance to use them. For now, I prefer a basic tool set like this which I keep in the shed.
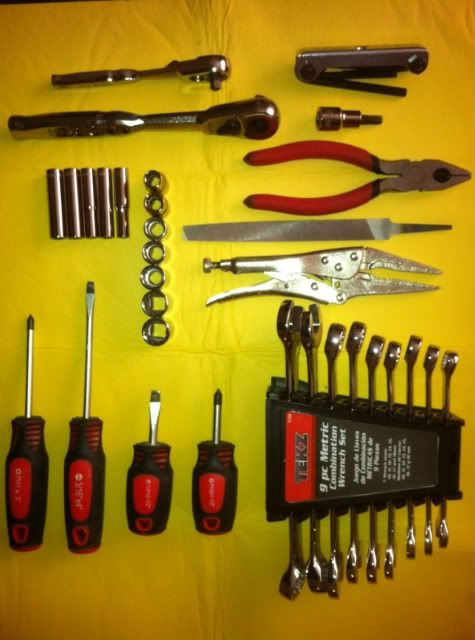
Unless you can afford to buy new tools or must have shiny new ones, get them used at pawnshops or see if anyone you know is cleaning out their garage. My friends are always throwing out perfectly good ones because they're "old" or they've found better ones. The day after Father's Day is a good time to check out craigslist for tools and tool boxes.
The things I consider for a started set:
1. Make sure the tools are metric sizes, measured in mm, since it's a Japanese bike.
2. Getting 6-point sockets instead of 12-point, better grip on the bolts and a lesser chance of stripping the bolt heads when your tightening them down.
3. If buying used, make sure your sockets match up with your ratchet drive.
4. Buying new, try to get them in sets since it's always cheaper.
Here are other tools and items worth keeping under the seat for emergencies or checks.
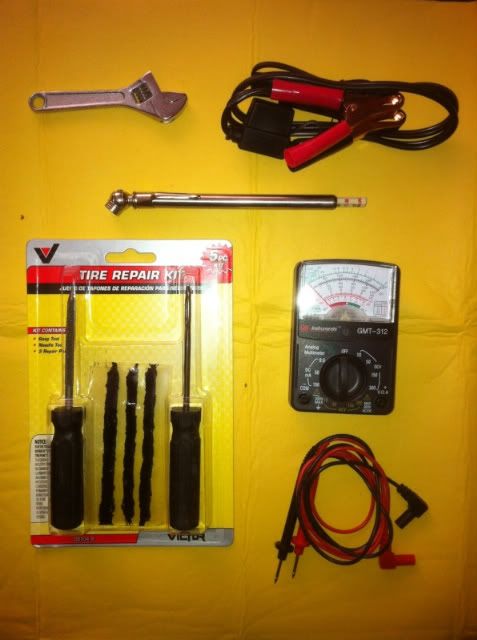
The jumper cables are from the Battery Tender Jr pack which I installed on the bike. Everything else I've already had from maintaining my car.
We'll get to more of those tools later down the road when I get a chance to use them. For now, I prefer a basic tool set like this which I keep in the shed.
Unless you can afford to buy new tools or must have shiny new ones, get them used at pawnshops or see if anyone you know is cleaning out their garage. My friends are always throwing out perfectly good ones because they're "old" or they've found better ones. The day after Father's Day is a good time to check out craigslist for tools and tool boxes.
The things I consider for a started set:
1. Make sure the tools are metric sizes, measured in mm, since it's a Japanese bike.
2. Getting 6-point sockets instead of 12-point, better grip on the bolts and a lesser chance of stripping the bolt heads when your tightening them down.
3. If buying used, make sure your sockets match up with your ratchet drive.
4. Buying new, try to get them in sets since it's always cheaper.
Here are other tools and items worth keeping under the seat for emergencies or checks.
The jumper cables are from the Battery Tender Jr pack which I installed on the bike. Everything else I've already had from maintaining my car.
Why not a V Star Custom 650?
I ran across some popular reasons women don't want the 650 and I wondered if some of them might have changed their minds if they knew you can modify some basic parts that will change the characteristics they don't like. I experienced same issues and after some research, determined that some basic mods will set them right for me. There were two things right from the start that I wanted to change immediately.
On the top of the list is seat height. The V Star Custom has a 27.4" listed seat height which I fit into well. 29" is pushing it for me and 30" is out of the question. I'm not sure if other women feel the same, but I want both feet flat with some bend on the knees to feel comfortable on a bike. It's a reassurance thing. And since it's over 500 lbs, having solid straddling support is more important than ever. Still, I wanted a lower seat height before I resort to replacing the shock head which I might do later. I'm now waiting on a custom solo seat by West Eagle to arrive in a week. It was on eBay for $159.
There are options for custom seats and most of them do lower the seat height as what other owners have been writing about. It depends on what your intentions are as well. I'm opting for a solo seat because I do not plan on carrying passengers along for the ride, I've already taken the pillion (passenger) seat off and I'm saving to buy a cargo rack to go in it's spot since I'm primarily going to use the bike for commuting to school/work. Before you buy the seat, make sure it fits the model you have. Some seats might require a mounting bracket so do ask the retailer about it. An added benefit to a custom seat is that it will always be more comfortable than the stock seat. Ask other owners in forums about their seat experience or read their reviews.
Ask any V Star owner about the clutch and most will describe it as horrendous. The friction zone is like 1/4" away from full disengagement. Hence the stories about stalls at stop signs plastered all over web forums. While some of them might be beginner's mistakes, all my friends who ride have commented that it's quite noticeable. To make it more beginner friendly, I did two modifications which I'll post about separately and it's now a dream to ride, even hill starts are a joke.
Background Tidbits
I started riding two wheelers in the Philippines where I grew up. We rode "underbone" motorcycles because they were quite nimble at the 100-125 cc range and priced economically (usually $1000). They were usually always customized, it was rare to see a complete stock model. My parents bought my brother a Honda Dream (as they were called back then) and the first thing he did when he parked it in our driveway was to strip it down to almost bare bones. I never saw the mud guards, engine guards, rear fender, and mini-fairings again.

This was a common practice because those parts interfered with the bike's wind resistance and weight, which were crucial points if you were going to race this little beast on the streets. Of course everyone did. It also helps when your country doesn't have any helmet laws or any type of protective equipment laws for that matter.
Once I started remembering the things we did to our motorcycles back then, I realized how customization is an essential part of the process to being attuned to your motorcycle. One model is factory built to appeal to tens of thousands of people. I look at it this way, stock bikes are blank canvases, you can do what you want with them as long as you start with a solid foundation.
Fortunately, I have a bit of mechanical experience from being an Aviation Support Equipment Technician in the Navy. Since it's such a wide field, I've been lucky to work with hydraulic systems, pneumatic systems, diesel engines, nitrogen equipment, and air conditioning. I'm far from being an expert, but I have the basic concepts down which have been enough to enable me to start working on my bike. Some of the things I say may contradict common world notions because I've learned most of this from the military, and if some of you don't know, most of the time we do things ass-backwards or completely unconventional. The Navy's theory on electronics vary from certain notions in the real world (as I like to call it), especially in aviation.
The Custom 650 is not a bad canvas for a starter bike. This blog shows an impressive 650 Custom in progress. He has a direction where he wants to take his bike to and has the ability and drive to get it there. Think about what you want to do with your bike. I'm already set on mine to make it a easy-to-handle and rider-friendly bike if that makes sense. I won't be concerned about looks for the mean time, only on comfort factors. There's an idea brewing in my head for what I want it to look like, but I'm going to take baby steps to get there.
Why Bother to Write?
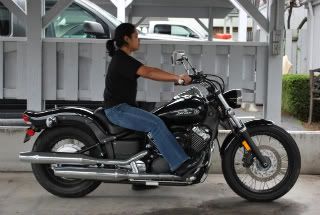
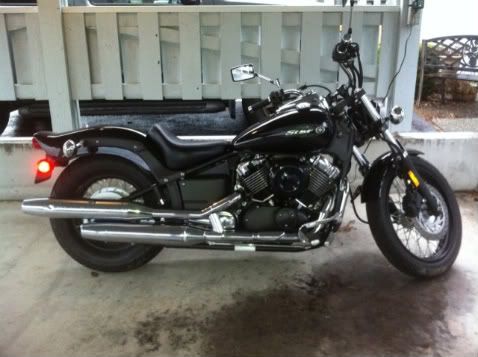
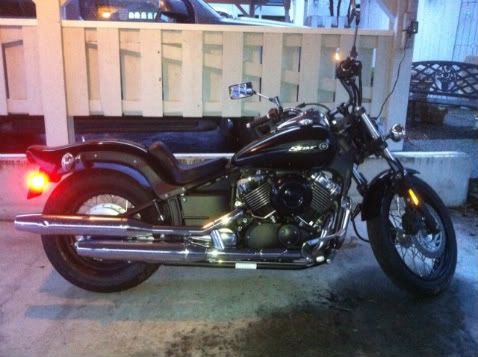
With so many motorcycle choices available today, I thought it would be a simple choice to buy one that fits. It's actually been quite an adventure to find a particular model that would fit my height. I'm 5'0 flat and 125 lbs on the day after Thanksgiving, fitting into a bike would prove to be interesting enough to write about it and that's the whole point of this blog. I settled on a 2009 Yamaha V Star Custom 650 and I want to share my experiences getting used to my new motorcycle, doing modifications, and some maintenance. And if I go off on a tandem because riding a bike can be quite EXHILARATING, then I might throw in a few personal thoughts.
It can be quite daunting for a woman to start riding a motorcycle, let alone purchasing one then modifying it to fit your needs and doing some basic maintenance work. This it to who my blog is geared towards. The riding part I'm not going to be extensive on because there are thousands of material already online for beginners, especially female beginners. But nothing about particular models geared toward women or modifications for them. I've noticed that women are continuously asking questions about the '09 V-Star 650 Custom and since I have one, it would be helpful to document the things I've done to it.
Now why on earth would I target such a small audience base? Short women riders who have V-Star 650 Customs. I can't get any more specific than that other than putting a color spec and model year. Because a lot of women look at the V Star 650, yet shy away from it because of its intimidating weight, size or fit. The remaining pool of women who stick with it often adapt to the bike instead of meeting the change halfway and transforming the bike as well to fit their needs. It's such a shame because the 650 is an awesome bike! With a few starting changes, you can tame it enough for a beginner, just like experienced riders who have this bike do some crazy mods to enhance performance suitable for their skill level. At least sit on it and give it a test ride, if it makes your heart beat faster and you absolutely start feeling something like love, seriously consider it.
Every forum for women riders I've run across have been mainly dealing with learning how to ride a bike or purchasing a bike tips. What if you know how to ride and just bought the bike? Now what? You can dive into the forums and start asking a lot of questions but if you're not familiar with a little bit of weekend garage wrenching, it can get quite confusing. Hopefully this blog will help. Any questions, just drop a note by commenting.
Subscribe to:
Posts (Atom)